The creation of RESTful services is one of the most common problems modern developers are tasked with. Obviously, any publicly-open service should also be secured and managed properly. Recently we at Smaato had exactly this sort of problem to solve and this article is here to showcase a working solution.
Prerequisites
The following technologies are used in this tutorial:
Java 11+Maven, Spring Boot, AWS ECR, Kubernetes, OneLogin as oauth2 provider.
To spice things up a little, I will also show you how to limit access for different endpoints to only specific user roles.
There are 3 parts: Project setup, OneLogin configuration, and Deployment on Kubernetes.
Part 1. Project setup
Doing RESTful services has never been easier. With all the “magic” around Spring Boot, a service is basically created for you with just a few lines of code. Spring will take care of all the rest. For starters, head over to https://start.spring.io/ and have your initial project created.
Since we will be building a RESTful service let’s add a couple of dependencies right from the start:
Next, let’s create a controller:
Start the application now you should be able to access localhost:8080/zoo/all in your browser.
Part 2. Security and roles
Setting up basic security
Since we don’t want our Zoo application to be freely accessible, a layer of security should be added. For this purpose there is only one dependency required:
Now let’s take a break from Java and switch to our oauth2 service. In this case, we will be using OneLogin. Generally speaking, any provider will work as long as it supports OpenId Connect (OIDC).
Head over to the web UI of the provider of your choice, set up an application, and obtain client id and client secret – those are the essential configuration parameters.
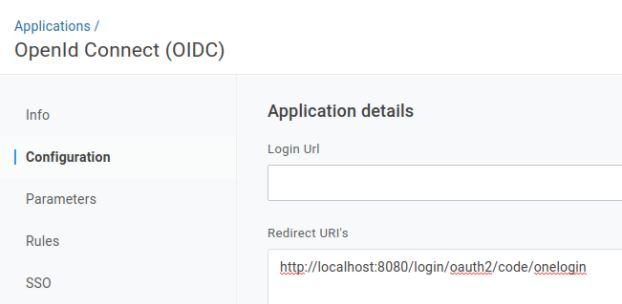
In case of
you should also specify the Redirect Uri to contain oauth2/code/onelogin:
Switching back to our project we can now set up the security configuration. There will be a new Configuration bean and OneLoginConfigs ConfigurationProperties created. Credentials will be stored in application.yml file.
Now to guide you through the main building blocks:
- Spring security allows you to extend
WebSecurityConfigurerAdapterin order to get access to theHttpSecurityclass which contains all the required configuration. - In the configure method we are using
antMatchersto allow (or later reject) access to certain endpoints. Like in the snippet above, “/”, “/login**”, “/oauth2/authorization/**” are allowed without any authentication. It is essential to give access to the “oauth2” path, otherwise your app will run into an endless loop of security checks. ClientRegistrationRepositorybean has all the required configuration to be able to connect to oauth2 provider.- Usually, secrets are stored in a secure place. In order to achieve exactly that,
clientIdandclientSecretare extracted intoapplication.ymlso they can be configured outside and accessed at runtime.
Now if you run your application and try to access localhost:8080/zoo/all in your browser, you will be redirected to the OneLogin authentication page. Only after being authenticated can access the requested resource.
Setting up roles
Suppose you need specific endpoints accessible only by selected users. Like in this case, authenticated users should be able to retrieve all animals, but only admins are allowed to add a new animal. Is it even possible to achieve that?
Luckily it is, and will require just a few lines of code.
But first things first – we need to prepare OneLogin for this.
Depending on your provider, the setup might be slightly different, but there surely should be a similar approach.
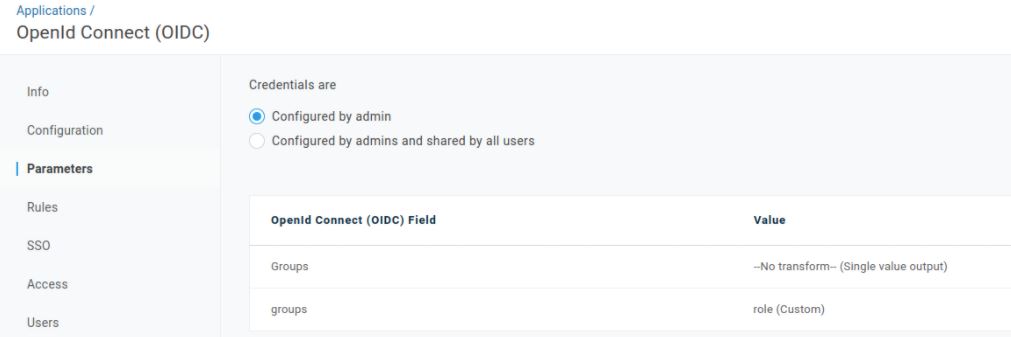
There is no out-of-the-box solution available in OneLogin to support multiple roles for different applications, so we will use a Custom User Field feature. Following this guide, create a field called “role” with two possible values – USER and ADMIN. This data then will be read on the application side and processed accordingly. In order to configure your app, open its Configuration and navigate to the “Parameters” tab. Click the plus icon on the right hand side and type a name that you want to be sent to the backend, in our case – groups. From the drop down field, choose the “role” value created earlier. You should end up with something like:
Now when the OneLogin setup is done, let’s switch back to code. There are 3 changes to be made in order to connect OneLogin configuration to the backend.
First, we need to create a class representing a Role, which then will be used in all the controllers, and also in the security configuration.
Next, we extend the SecurityConfiguration class to take roles into account and to make use of “groups” created in OneLogin:
Let’s highlight the important changes made:
* ClientRegistration scope has been extended with “groups” scope which means our App will be reading and processing that field from the oauth2 provider response
* Endpoints have been secured with HttpSecurity configuration. Now, in order to access an endpoint, a proper access role is required
* GrantedAuthoritiesMapper bean has been set up to process the response from oauth2 provider and convert them into Roles that our App can handle
Last but not least, let’s secure the ZooController endpoints with the appropriate Roles:
You may be wondering, why should we secure the endpoints in two places – Controller itself and SecurityConfiguration? The reason behind this is rather simple: it adds an additional level of protection to your application. We won’t dive too deep into the details of security in this article, but if you want to know more check out this StackOverflow answer.
It’s time to run the app one more time! Note that you will not be able to access the endpoints unless you are authenticated with the corresponding role.
Part 3. Deployments
In this section, we will deploy our application into EKS – managed AWS Kubernetes service. All the infrastructure code will be created considering multi-environment setup (test, stage, prod etc.)
Note! The following assumes that you’re familiar with technologies such as AWS, EKS, ECS and Docker.
The instructions pertain to Linux-based system, and you will need to have the following packages installed:
* docker
* aws-cli
* kustomize
* kubectl
Additionally, your deployment environment should have access to your AWS account, and have correct permissions to perform EKS- and ECS-related activities.
Our deployment pipeline will consist of multiple steps. First, we need to build an image that will be later used on K8s. Conveniently, Spring Boot provides us with a handy plugin to achieve exactly that. Add the following build block into the pom.xml file
That unlocks the following command:
mvn spring-boot:build-image -Dspring-boot.build-image.imageName=${ECR_BASE}:${VERSION}
where ECR_BASE is the path to your ECR repository container and VERSION is the version you want to deploy (usually, it corresponds to the version in pom.xml)
After successful execution, you will have a docker image on your deployment environment. You can run it just like any other docker image and check if it works correctly.
The next logical step is to push the image to the AWS ECS repository:
docker tag ${ECR_BASE}:${VERSION} ${ECR_BASE}:latest

docker push ${ECR_BASE}:${VERSION}
After that, you should be able to see the image in AWS console.
Lastly, run the image on AWS EKS!
We’ll use kustomize with a separate overlay per each environment. The files structure are as following:
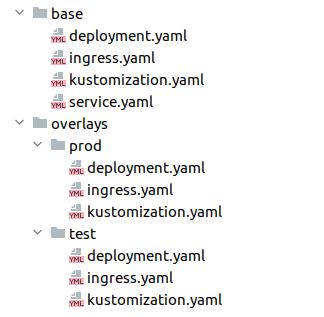
Let’s have a look at the base module files:
deployment.yaml
This is a rather standard deployment configuration.
Don’t forget to specify the correct AWS_REGISTRY
ingress.yaml
One particularly interesting part of the ingress is the affinity configuration. Since we will likely have more than one pod in the cluster, the stickiness should be enabled so the same upstream pod is selected whenever a cookie returned from oauth2 provider is present.
service.yaml
Specify the port accordingly. In this case 8080 is used.
kustomization.yaml
This is the final file to wire it all together.
Now you can customize the behaviour based on the specified overlays, e.g. if you want to have different endpoints for test and prod, you just need to create an ingress.yaml file with the desired value
overlays/prod/ingress.yaml
overlays/test/ingress.yaml
In order to apply the changes to the k8s cluster, run the following two commands:
kustomize edit set image ${ECR_BASE}:${VERSION}
kustomize build deployment/kubernetes/overlays/${ENV} | kubectl apply -n zoo -f -
Once deployment is complete, you should be able to access your newly created RESTful service via the specified URL.
Congratulations!
Well done! You’ve completed the tutorial! Now you have a fully functional modern RESTful service deployed on AWS EKS secured with oauth2 provider with managed roles.